 Facundo Uferer
🔄 Pulling and Pushing Changes: Remote Repositories and GitHub
Working in isolation on your local machine is only the first step. The true power of version control emerges when you synchronize your work with remote repositories hosted on platforms like GitHub, collaborating smoothly with other developers.
In this lesson, you will learn:
- The architecture connecting local repositories and remote origins (
origin). - How to publish local commits to the cloud with
git push. - The crucial difference between
git fetchandgit pull. - How to configure upstream tracking branches with
-u. - The daily synchronization workflow to safely pull remote updates without losing progress.
🔁 Key Idea Before Starting
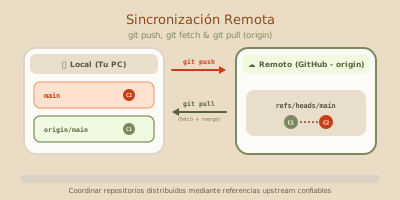
When you use Git, there are typically two copies of the project:
1️⃣ Your Computer (local repository)
2️⃣ Internet (GitHub) (remote repository, conventionally named origin)
👉 Pulling changes (git pull) = bringing what is on GitHub into your local PC
👉 Pushing changes (git push) = sending what you committed locally to GitHub
git push uploads your local commits to GitHub, while git pull downloads remote commits and merges them into your active branch.📥 PULLING CHANGES (pull)
🧠 When do you need to pull changes?
- When starting your workday
- When a teammate pushed updates to the project
- When working across multiple machines
- To prevent unnecessary merge conflicts
💡 Golden Rule:
👉 Before you start working → pull changes
🔹 Primary command to pull changes
# Download commits from the remote repository and merge them into the active branch
git pull
What does git pull do?
It performs two operations automatically:
- 📥
git fetch: Downloads newly pushed commits from the remote repository without touching your working files. - 🔀
git merge: Automatically merges those remote commits into your active local working branch.
📌 Real Step-by-Step Example
Situation:
- Your project is hosted on GitHub
- A teammate modified a file
- You want those changes on your machine
Steps:
1️⃣ Navigate to the project directory:
# Navigate to the project root directory
cd my-project
2️⃣ Pull the latest changes:
# Fetch and merge updates from GitHub
git pull
3️⃣ Git responds with an update summary:
Updating a1b2c3d..e4f5g6h
Fast-forward
 1 file changed, 4 insertions(+)
🎉 You now have the latest project state locally.
❗ Common Error When Pulling
If Git reports:
error: Your local changes to the following files would be overwritten by merge👉 This means:
You have uncommitted changes in your working tree on lines that also changed on the remote branch.
Solution:
Commit your local changes first before pulling:
# 1. Stage your local work
git add .

# 2. Commit your modifications
git commit -m "chore: save local work before pulling"

# 3. Pull and merge the remote updates
git pull
📤 PUSHING CHANGES (push)
🧠 When do you need to push changes?
- When you complete a specific task or feature
- When you want to backup your work to GitHub
- When teammates need your commits
💡 Golden Rule:
👉 After you finish and verify your work → push changes
🔹 Full Workflow to Push Changes
⚠️ Remember this core sequence:
Edit → git add → git commit → git push📌 Complete Example of Pushing Changes
1️⃣ Modify a file
Edit hello.txt in your editor.
2️⃣ Check status
# Check modified files in the working directory
git status
3️⃣ Stage changes
# Stage the modified files for the upcoming commit
git add .
4️⃣ Commit changes
# Save the new version snapshot to your local repository
git commit -m "docs: update greeting message"
👉 Up to this point, EVERYTHING IS LOCAL (only on your PC).
5️⃣ Push to GitHub
# Send your local commits to the tracked remote branch
git push
🎉 Your commits are now live on GitHub.
🌍 Pushing for the First Time (Upstream Tracking)
The first time you push a branch, Git needs to know the target remote and branch name:
# Push the local 'main' branch to remote 'origin' and set upstream tracking (-u)
git push -u origin main
What does this mean?
origin→ the default alias for your remote GitHub repositorymain→ the branch you are publishing-u(or--set-upstream) → records the link between localmainandorigin/main
After configuring this once, for everyday work you simply run:
# Push commits to the configured upstream branch
git push
🔄 Real-World Daily Workflow
In professional teams, you follow this exact disciplined sequence:
# 1. At the beginning of the workday: get teammates' latest work
git pull

# 2. Write code, add tests, and verify locally...

# 3. Stage completed modifications
git add .

# 4. Commit with a clear, single-purpose message
git commit -m "feat: add discount calculation logic"

# 5. Publish your commits to the shared repository
git push
📌 Following this cycle keeps your repository healthy.
⚠️ Conflicts When Pulling Changes
A conflict occurs when:
- You modified a line in a file
- Someone else modified that exact same line on GitHub
- Git cannot automatically determine which version to keep
Git will display conflict markers in the file:
<<<<<<< HEAD
Your local changes
=======
Changes coming from GitHub
>>>>>>> remote_commit_hash
How to resolve it:
- Open the file in your code editor.
- Decide which version to preserve (or combine them).
- Delete the conflict marker lines (
<<<<<<<,=======,>>>>>>>). - Save the clean file.
- Record the resolution commit:
# 1. Stage the resolved file
git add .

# 2. Create the conflict resolution merge commit
git commit -m "fix: resolve merge conflict with origin/main"

# 3. Push the resolved state to GitHub
git push
🧠 Essential Commands Summary
| Action | Command |
|---|---|
| Check status | git status |
| Download and merge remote changes | git pull |
| Stage changes | git add . |
| Commit changes | git commit -m "message" |
| Push commits to remote | git push |
| Push and set upstream tracking | git push -u origin main |
❌ Common Beginner Mistakes
❌ Running git push without running git pull first
❌ Making massive commits with vague messages like “changes”
❌ Committing directly to shared main without feature branches
❌ Panicking when a merge conflict occurs instead of inspecting the file markers
🧠 Final Golden Rule
📥 Before starting work → git pull
📤 After completing work → git push