Facundo Uferer
Branches and Pull Requests
In the previous lesson you worked alone, directly on main, to learn how to sync with a remote. In a team that does not scale: here you will combine what you already know about branches (lesson 3) and remotes (lesson 4) into the workflow almost every team on GitHub uses.
In this lesson you will learn:
- Why a team does not push changes directly to
main. - The feature branch workflow from start to finish.
- How to open a Pull Request on GitHub and how review works.
- How to keep your branch up to date with
mainand resolve a conflict before the merge. - Which merge options GitHub offers and how to clean up branches when you are done.
Why nobody pushes straight to main
main is the branch the whole team shares and, usually, the one that gets released. If everyone pushes their commits there as soon as they make them:
- A bug reaches everyone without anybody having reviewed it.
- Half-finished changes get mixed with code that already works.
- There is no place to discuss a change before accepting it.
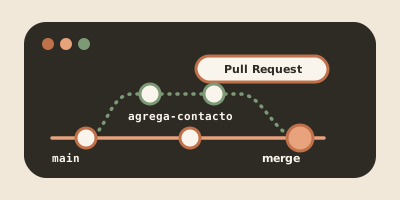
The solution is for every task to live on its own branch. When the task is ready, you propose integrating it into main with a Pull Request (PR): a GitHub page that shows the differences between your branch and main, where the team comments, requests changes and, finally, approves and merges.
add-contact branch leaves main, gets commits while the Pull Request is reviewed, brings in what reached main (B) and returns to main with the merge (M).This lesson’s example
Ana and Ben work on a team’s website. The GitHub repository has index.html and a menu in menu.html:
<nav>
  <a href="index.html">Home</a>
</nav>
Ana’s task is to add a contact page. All the commands below run in her clone.
The feature branch workflow
1. Start from an up-to-date main
Before creating the branch, switch to main and bring in the latest from the remote, so the branch starts from the most recent state:
git switch main
git pull
Already on 'main'
Your branch is up to date with 'origin/main'.
Already up to date.2. Create the branch and work on it
Use a short name that describes the task:
git switch -c add-contactSwitched to a new branch 'add-contact'Work and commit as usual. You can make one commit or several:
git add contact.html
git commit -m "Add contact page"
[add-contact b4efc3f] Add contact page
1 file changed, 2 insertions(+)
create mode 100644 contact.html3. Push the branch to the remote
The first time, -u connects your local branch to the remote one, just like you did with main in lesson 4:
git push -u origin add-contactTo github.com:team/website.git
* [new branch] add-contact -> add-contact
branch 'add-contact' set up to track 'origin/add-contact'.When the remote is GitHub, the response also includes a few lines starting with remote: and a link to create the Pull Request for that branch. From now on, on this branch a plain git push is enough.
Opening the Pull Request
From the GitHub website
- Go to the repository on GitHub. Right after the push, a yellow banner appears with the Compare & pull request button. If you do not see it, go to the Pull requests tab and click New pull request.
- Check the two branches at the top: base is the branch that will receive the changes (
main) and compare is your branch (add-contact). - Write a clear title, for example “Add contact page”.
- In the description, explain what changes, why, and how to test it. The reviewer was not inside your head while you were coding.
- If your team uses them, pick reviewers under Reviewers.
- Click Create pull request.
The PR shows a Commits tab with your commits and a Files changed tab with the line-by-line differences.
From the terminal with GitHub CLI
If you set up gh in lesson 4 (gh auth login), you can open the PR without leaving the terminal:
gh pr create --base main --title "Add contact page" --body "New page with the team's email address."gh creates the PR and prints its address. Running gh pr create without options asks for the details one by one.
The review
The reviewer opens Files changed and can:
- Leave comments on a specific line (with the + button that appears on hover).
- Finish the review with Review changes and choose Comment, Approve or Request changes.
Comments are not personal attacks: they are how the code that reaches main ends up understood by at least two people. Answer each one, and once you address it, mark the thread with Resolve conversation.
More commits update the same PR
Suppose Ben asks: “Add a link to the contact page in the menu”. Ana does not open a new PR: she stays on her branch, makes the change and pushes another commit.
git add menu.html
git commit -m "Link the contact page from the menu"
git push
[add-contact 330bf8b] Link the contact page from the menu
1 file changed, 1 insertion(+)
To github.com:team/website.git
b4efc3f..330bf8b add-contact -> add-contactThe PR follows the branch, not a fixed commit: the new commit shows up in it right away and Ben can review again.
Keeping the branch up to date with main
While Ana’s PR was waiting for review, the team accepted Ben’s PR, which added a blog link to the same menu. main moved forward and Ana’s branch fell behind. GitHub says so on the PR, and if there is a conflict it shows This branch has conflicts that must be resolved and does not allow the merge.
The way to catch up that you already know is to bring in main and merge it into your branch:
git fetchFrom github.com:team/website
* [new branch] add-blog -> origin/add-blog
0aaf85e..2588f0d main -> origin/maingit fetch updated origin/main without touching your files. Now merge that remote branch into yours (no need to switch to main):
git merge origin/mainAuto-merging menu.html
CONFLICT (content): Merge conflict in menu.html
Automatic merge failed; fix conflicts and then commit the result.Resolving the conflict on your branch
It is an ordinary merge conflict, the same one from lesson 3, where you will find what the markers mean. menu.html now looks like this:
<nav>
  <a href="index.html">Home</a>
<<<<<<< HEAD
  <a href="contact.html">Contact</a>
=======
  <a href="blog.html">Blog</a>
>>>>>>> origin/main
</nav>
The menu must have both links. Leave the file like this, without markers:
<nav>
  <a href="index.html">Home</a>
  <a href="blog.html">Blog</a>
  <a href="contact.html">Contact</a>
</nav>
Mark the conflict as resolved, finish the merge with its default message and push the result:
git add menu.html
git commit --no-edit
git push
[add-contact cb26567] Merge remote-tracking branch 'origin/main' into add-contact
To github.com:team/website.git
330bf8b..cb26567 add-contact -> add-contact--no-edit accepts the message Git proposes without opening the editor. The PR no longer has conflicts. This is the history now:
git log --oneline --graph --all* cb26567 Merge remote-tracking branch 'origin/main' into add-contact
|\
| * 2588f0d Merge pull request #1 from ben/add-blog
| |\
| | * 4ad06a6 Add blog link
| |/
* | 330bf8b Link the contact page from the menu
* | b4efc3f Add contact page
|/
* 0aaf85e Add home pageResolving the conflict on your branch, and not on main, has an advantage: the PR shows the resolution and the team reviews it before it reaches main. If you get lost in the middle of the merge, git merge --abort takes you back to where you were.
GitHub’s merge options
Once the PR is approved, the green button at the bottom performs the merge. Its arrow lets you pick one of three ways:
| Option | What it does on main | When it fits |
|---|---|---|
| Create a merge commit | Adds every commit of the branch plus a merge commit that joins them | You want to keep every commit and see where the PR came in |
| Squash and merge | Combines all the branch’s commits into a single new commit | The branch’s commits are intermediate steps (“fix”, “again”) |
| Rebase and merge | Copies the branch’s commits one by one on top of main, with no merge commit | You want a linear history; you will understand it in lesson 6 |
Each repository decides which of these options are allowed.
After the merge
The branch did its job. Update your local main, which does not have the merged work yet:
git switch main
git pull
Switched to branch 'main'
Your branch is behind 'origin/main' by 2 commits, and can be fast-forwarded.
(use "git pull" to update your local branch)
From github.com:team/website
2588f0d..29d937d main -> origin/main
Updating 0aaf85e..29d937d
Fast-forward
contact.html | 2 ++
menu.html | 2 ++
2 files changed, 4 insertions(+)
create mode 100644 contact.htmlDelete the local branch, which is already merged:
git branch -d add-contactDeleted branch add-contact (was cb26567).Delete the remote branch too (GitHub also offers a Delete branch button on the merged PR):
git push origin --delete add-contactTo github.com:team/website.git
- [deleted] add-contactBen’s clone still lists origin/add-contact, because git fetch does not remove remote branches that no longer exist by default. With --prune it does:
git fetch --pruneFrom github.com:team/website
- [deleted] (none) -> origin/add-contactIf the PR was merged with Squash and merge, your branch’s commits are not on main (there is a new one summarizing them) and git branch -d refuses with error: the branch 'add-contact' is not fully merged. If you checked on GitHub that the PR is merged, delete it with git branch -D add-contact, which skips that check.
Branch protection rules
So that nobody pushes straight to main even if they want to, GitHub lets you protect branches from Settings > Branches or with Rulesets. The most common rules:
- Require a pull request before merging: a direct
git pushtomainis rejected. - Require approvals: at least one approval from someone else is needed.
- Require status checks to pass: the merge waits for the automated tests to pass.
With these rules, the workflow in this lesson stops being a habit and becomes mandatory.
Summary
| Step | Command or action |
|---|---|
Start from an up-to-date main | git switch main and git pull |
| Create the branch | git switch -c <branch> |
| Push it the first time | git push -u origin <branch> |
| Open the PR | Compare & pull request or gh pr create |
| Respond to review | More commits and git push |
Catch up with main | git fetch and git merge origin/main |
| Clean up after the merge | git switch main, git pull, git branch -d <branch>, git push origin --delete <branch>, git fetch --prune |
Practice exercises
You can do these exercises alone and without GitHub: a bare repository acts as the server and two clones act as Ana and Ben. Set up the scenario once:
mkdir pr-practice && cd pr-practice
git init --bare team.git
git clone team.git ana
git clone team.git ben
cd ana
git config user.name "Ana"
git config user.email "ana@example.com"
printf '<nav>\n  <a href="index.html">Home</a>\n</nav>\n' > menu.html
git add menu.html
git commit -m "Add menu"
git push -u origin main
cd ../ben
git config user.name "Ben"
git config user.email "ben@example.com"
git pull
Since a local repository has no Pull Request button, Ben, acting as the reviewer, simulates the PR merge: he merges the branch into his main with a merge commit and pushes it. That is the same thing GitHub does with Create a merge commit.
Exercise 1: a PR from start to finish
From Ana’s clone, create the add-contact branch, add contact.html with a commit and push the branch. Then, from Ben’s clone, fetch the branch, merge it into main the way the merge button would, and push. Finally, go back to Ana and update her main.
Show solution
cd ../ana
git switch main
git pull
git switch -c add-contact
echo "<h1>Contact</h1>" > contact.html
git add contact.html
git commit -m "Add contact page"
git push -u origin add-contact

cd ../ben
git fetch
git merge --no-ff -m "Merge pull request #1 from ana/add-contact" origin/add-contact
git push

cd ../ana
git switch main
git pull
--no-ff forces a merge commit even when Git could move main forward in a straight line, just like GitHub’s Create a merge commit. At the end, git log --oneline --graph in Ana’s clone shows the merge commit on top of her commit.
Exercise 2: updating the branch and resolving a conflict
Ana creates the add-blog branch and adds <a href="blog.html">Blog</a> to menu.html, below Home; she commits and pushes the branch. Meanwhile Ben, on main, adds <a href="faq.html">FAQ</a> in the same position, commits and pushes. Bring Ana’s branch up to date with main, resolve the conflict keeping both links, and push the result.
Show solution
cd ../ana
git switch -c add-blog
# edit menu.html and add the blog link
git add menu.html
git commit -m "Add blog link"
git push -u origin add-blog

cd ../ben
git pull
# edit menu.html and add the FAQ link
git add menu.html
git commit -m "Add FAQ link"
git push

cd ../ana
git fetch
git merge origin/main
# CONFLICT (content): Merge conflict in menu.html
# edit menu.html: keep both links and remove the markers
git add menu.html
git commit --no-edit
git push
The conflict is resolved on Ana’s branch, not on main; in a real PR, the team would see that resolution before the merge.
Exercise 3: merging and cleaning up
From Ben’s clone, simulate the merge of the add-blog branch from exercise 2 and push it. Then, from Ana’s clone, update main and delete the local and the remote branch. Finally, in Ben’s clone, check with git branch -a that he still sees origin/add-blog, and make it go away.
Show solution
cd ../ben
git fetch
git merge --no-ff -m "Merge pull request #2 from ana/add-blog" origin/add-blog
git push

cd ../ana
git switch main
git pull
git branch -d add-blog
git push origin --delete add-blog

cd ../ben
git branch -a
git fetch --prune
git branch -a
git branch -d works because the branch is already merged into main. Ben’s first git branch -a still lists remotes/origin/add-blog; after git fetch --prune it is gone.
Exercise 4: the same PR gets more commits
From Ana’s clone, create the improve-contact branch, change the heading of contact.html, commit and push the branch. Imagine Ben asks in the review for a paragraph with the email address. Make that change and push it. Do you need to open anything new? From Ben’s clone, check which commits the remote branch has.
Show solution
cd ../ana
git switch -c improve-contact
# edit the heading of contact.html
git add contact.html
git commit -m "Improve the contact heading"
git push -u origin improve-contact
# add the paragraph with the email address
git add contact.html
git commit -m "Add the contact email"
git push

cd ../ben
git fetch
git log --oneline main..origin/improve-contact
You do not need to open anything new: the PR follows the branch, so every git push updates it. Ben’s git log shows the branch’s two commits.