 Facundo Uferer
🚀 Getting Started with Git: Fundamentals and First Steps
Version control is the foundational skill of every modern software engineer. Without it, coordinating code across a team or safely reverting to a working state is virtually impossible.
In this lesson you will learn:
- What Git is and why it became the undisputed industry standard.
- Core concepts: repositories, tracked files, commits, and project history.
- How to install Git and configure your required identity with
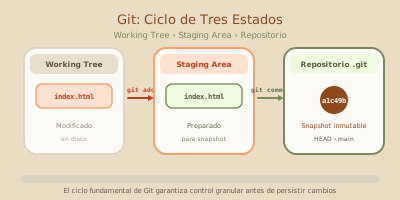
git config. - The three-state lifecycle: Working Directory, Staging Area, and Repository.
- How to inspect log history and create your first branches.
What is Git?
Git is a version control system.
👉 In simple terms:
Git stores the history of changes in a project, just like a “save game” in a video game.
Simple Analogy
Imagine you’re writing a paper in Word:
- Version 1
- Version 2
- Final version
- Final FINAL version 😅
Git does this automatically, but:
- It saves every change
- It lets you go back in time
- It allows you to work in a team without overwriting each other
- It works perfectly with code
🧠 Why is Git So Important?
Learning Git lets you:
- Never lose your work
- Collaborate with others
- Try ideas without breaking anything
- Work like a professional programmer
💡 ALL tech companies use Git.
🧩 Core Concepts (very important)
Before using commands, you need to understand these key concepts:
1️⃣ Repository (repo)
It’s the project.
📦 Think of a repository as:
A special folder that Git controls
It can contain:
- Code
- Images
- Documentation
- Any file
2️⃣ File
These are your normal files:
.html.css.js.txt
Git watches these files and detects changes.
3️⃣ Version / Commit
A commit is a snapshot of the project at a point in time.
📸 Each commit:
- Has a message (“what I did”)
- Has a date
- Has an author
Example commit message:
Add login button4️⃣ History
Git stores all commits in order.
This lets you:
- See what changed
- Go back to a previous version
- Know who did what
🧰 Installing Git
On Windows
Download from:
👉 https://git-scm.com
Install with default options.
On macOS
brew install gitOn Linux
sudo apt install gitVerify it’s installed:
git --version⚙️ Initial Configuration (mandatory before starting)
Before creating your first commit, Git needs to know who you are. Every change in history is signed with an author name and email.
Setting up your identity
Run in your terminal:
git config --global user.name "Your Full Name"
git config --global user.email "your-email@example.com"
💡 Important note:
user.nameanduser.emailare metadata used to sign commits, not credentials to authenticate with GitHub. Use the email associated with your GitHub account so GitHub links your commits to your profile.
Setting the default initial branch
Git historically used master as the default branch name. The modern industry and GitHub standard is main:
git config --global init.defaultBranch mainWhere is this configuration saved?
--global: Applies to all projects on your machine (saved in~/.gitconfig).--local: Applies only to the current repository (useful if you have separate personal and work emails).
To verify your active configuration at any time:
git config --list🚀 Getting Started with Git (first steps)
Step 1: Create a project
Create a folder and navigate into it:
# Create the directory for our new project
mkdir my-project

# Enter the project directory
cd my-project
Step 2: Initialize Git
Inside the folder:
# Initialize an empty local Git repository in this folder
git init
👉 This creates a Git repository.
💡 Git now controls this folder.
📂 Git Status (very important)
You can always ask:
# Check the current status of the working tree and staging area
git status
This tells you:
- What files changed
- What’s ready to save
- What’s not
📝 Create Your First File
Create a file named:
hello.txtContent:
Hello, this is my first Git projectCheck status:
# See how Git detects the new untracked file
git status
You’ll see something like:
untracked new file
➕ Adding Files (staging)
Git works with 3 core areas:
1️⃣ Working Directory
Your everyday files on disk where you code and make changes.
2️⃣ Staging Area (Index)
The staging area where you hand-pick exactly which modifications will form the next commit snapshot.
3️⃣ Repository (.git)
The local database where Git permanently stores history as immutable commits.
git add into the Staging Area, and committed with git commit to the permanent local repository.To move a file to staging:
# Stage a specific modified or new file
git add hello.txt
Or all modified files at once:
# Stage all current working directory changes
git add .
💾 Saving Changes (commit)
Now save the changes:
# Create a commit that records staged changes into history with an author message
git commit -m "Add hello.txt file"
🎉 First commit done!
🔁 Basic Git Flow (memorize this)
This is the most important Git flow:
Edit → git add → git commitIt’s always like this.
🧪 Modifying a File
Edit hello.txt:
Hello world
I'm learning Git
Check status:
# Verify which files have unstaged modifications
git status
Add and save:
# Stage the modified file
git add .

# Record the new version into the local repository
git commit -m "Update greeting message"
⏪ Going Back in Time
View history:
# Show the chronological list of commits with hashes, authors, and dates
git log
You’ll see a list of commits. Each commit has a unique ID (hash).
To go back to a commit:
# Inspect the project state at a specific past commit (read-only mode)
git checkout COMMIT_ID
⚠️ This is read-only mode (not for working directly).
🌿 Branches
What is a branch?
A branch is a parallel line of work.
🌱 It lets you:
- Try ideas without breaking the main project
- Collaborate simultaneously without interfering with others
The main branch is called:
mainCreating a branch
# Create a new branch pointing to the current commit
git branch new-feature
Switch to it:
# Switch to the newly created branch
git checkout new-feature
Or in one step (recommended):
# Create and switch to the branch immediately
git checkout -b new-feature
Merging branches
Go back to main:
# Return to the main branch
git checkout main
Merge:
# Merge commits from new-feature into the active branch (main)
git merge new-feature
🌍 Git vs GitHub (very important)
🚫 Git is NOT GitHub
| Git | GitHub |
|---|---|
| Local tool | Online platform |
| Controls versions | Stores repositories |
| Works offline | Requires internet |
GitHub uses Git, but they are not the same thing.
☁️ Uploading a Project to GitHub (basic)
- Create an empty repository on GitHub (without initial README or .gitignore).
- Connect your local repository:
# Link the local repo to GitHub under the standard remote alias 'origin'
git remote add origin https://github.com/your-user/your-repo.git- Upload code and establish upstream tracking:
# Push the local 'main' branch to 'origin' and remember tracking (-u)
git push -u origin main
📥 Downloading a Project
# Clone an entire repository from GitHub to your local machine
git clone https://github.com/user/repo.git
⚠️ Common Mistakes
❌ Not committing often
❌ Bad commit messages
❌ Working without branches
❌ Not using git status
🧠 Next Steps in this Course
Now that you know the fundamentals and local cycle, continue with the following lessons in this course:
- Lesson 2: Pulling and Pushing Changes: Remote synchronization with GitHub (
pull,push, tracking branches). - Lesson 3: Merging Branches and Conflicts: Collaborative branching workflows (
branch,merge) and step-by-step conflict resolution. - Lesson 4: Rebase and Best Practices: Step-by-step rebase, linear history, atomic commits, Conventional Commits, and proper
.gitignoremanagement.
📌 Final Summary
Git lets you:
- Save versions
- Go back in time
- Work in a team
- Program professionally
Key everyday flow:
# 1. Check which files changed
git status

# 2. Stage the selected modifications
git add .

# 3. Save the snapshot with a clear message
git commit -m "feat: add clear message"